The Runaway Cook

A diary of culinary adventures

Gnocchi in Salerno

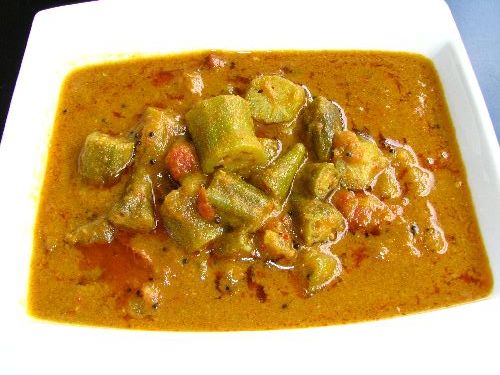
Gnocchi con salsa di pomodoro


 billowy clouds of potato, oddly shaped and floating in a crock of rich red sauce


It's a still night here is Salerno and I'm wearing my black dress with little black sweater to keep the chill out. The sky is showing her sparkling starts and the water's edge is shimmering with the combination of light from town and milky way.  I've decided to find a little restaurant to eat some pizza and gnocchi this evening. Walking down the streets like walking through restaurant after restaurant. Everyone is seated outside under canopies and music plays softly blending from one block of seats to the next. 


Menus boast of pastas, seafood, pizzas, and wines, while waiters smile and say prego to everyone within seating range. Candles flicker and seems to whisper invites to us all. The cobblestone streets are full women in heels and med in smooth slacks. I can't help but walk with a a smile in the corner of my mouth. 


I picked a small restaurant of the main street, smackdab in the middle of this stretch of eateries. After margarita pizza I indulged in the best Gnocchi I have had to date. It seemed very authentic compared to other gnocchi I have eaten in the US and Italy. Rather than the perfect squares and ridged ovals these were pinched and slightly flattened dumplings of tender potato. 


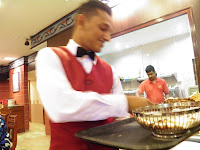
Needless to say, I was very pleased. The icing to my cake was being able to get glimpses of flour poofing into clouds in the open kitchen right inside.


To make gnocchi at home try this recipe. I know gnocchi sounds difficult, but it's just a matter of 


2 lbs – 2 oz. whole baking potatoes
1 beaten egg
2-1/4 cups flour
1 hefty pinch of salt


1.  Add potatoes whole and skin-on in cool salted water, bring to boil and cook until fork tender.
2. Drain the potatoes immediately, then peel being careful not to burn yourself.
3. Pass the potatoes through a potato ricer or foodmill.
4. Add egg, flour and salt to riced potatoes.
5. Mix until crumbles form a pliable ball of dough.
6. Dust counter with flour and roll out a piece of dough with your hands until you have logs about 3/4 inch in diameter.
7. Cut the logs of dough into chunk about one inch long.
8. (OPTIONAL) Hold the tines of a fork against your work surface, then gently press and a piece of dough against the fork with your fingers (Will form a gnocchi with an indent on back from your finger and a grooves on the front from the tines of the fork).
9. Be careful with the gnocchi so they don’t loose their shape as you place them on a lightly flour plates. (don’t let them touch one another or they’ll stick).
10. In a pot of boiling water add the gnocchi carefully, one plateful at a time. As soon as they float, remove the gnocchis with a slotted spoon and set them and drain off the water. ( If making many of these it may be a good idea to shock in ice water then strain and set aside, however they will stick and don't keep well just sitting on the counter).
11. Add more gnocchi to the water and serve the others right away.


Cover in olive oil and basil, butter and garlic, parm, mushrooms, and thyme, or some delicious tomato sauce. MMMMM delish


Photo from: http://www.cookingwithpatty.com/italian/recipe/gnocchi-with-tomato-sauce/

The Last Night

How strange to be putting an end to this chapter tomorrow only to begin a far scarier one alone. I can hardly believe that it's been a month since I arrived in a panic from Rome to Singapore.

With only hours left to my stay here in Singapore I have once again traveled to my favorite place, Little India. I feel so natural here, comfortable in the alien parallel universe that it is. I love the people here. Shop keepers are sweet and care about who you are, not how deep your pockets are. I love how genuine and dirt-under-their-fingernails it feels in this cubicle of the city. I just can't get enough of the smell here. I know that it seems like all I talk about is the smell here, but it's just that this sensation overwhelms your body and imprints a memo
ry that covers you like a blanket every time you get a whiff of it.

Tonight I spent the whole evening walking up and down the shadowy streets with friends. Stopping of course to eat at our favorite place Anjappar. This small Indian restaurant is where the best food is. If you go to Singapore you must stop to eat here.

On the menu for us:
Filled flatbreads
Chicken tikka
Biryani
Curried vegetables
Idli
Paratha
Yogurt sauce
Lime juice


These are all favorites of mine. The warm rice pilaf of poultry, spices, herbs, fruits, and nuts that is biryani can calm all my nerves in a second. But beyond the dense curries and refreshing yogurt raita, the most amazing array of Indian foods that are the base to the meal, literally, the bread.

Paratha
My favorite is called Roti Paratha, what I like to say is the baby of a croissant and a tortilla. (See Recipe Below) This flatbread has buttery thin layers just like puffed pastry, yet is cooked flat in a pan like a tortilla. I can't seem to get enough of this stuff and plan on making for myself at home and school.

This bread makes the perfect edible utensil to eat pretty much anything. I love sopping up my curry sauce with it hehehehe. This bread is sold all over and can be made so that the little air pockets are filled with cheese, cinnamon and sugar, or even egg. It's pretty amazing. TRUTH- i actually smuggled in parata to this restaurant from a street vender that makes it just as good but for half the price- eek shhhhhhhh.

Idli
My second favorite is called idli. This is like a pancake made from a sourdough-like, fermented rice and lentil batter. The batter is steamed and comes out with a cake-like texture. Perfect for sopping up anything. I love the flavor of this, it's very similar to a sourdough pancake. . .but better and goes perfectly with juicy curries.

Lime Juice
Lime juice is actually a kind of "lemonade" drink made with these little dark green limes that are not nearly as harsh as the limes we are used to. So imagine lime-ade with none of that acidic harshness in the back of one's throat... that's a "lime juice."

After stuffing ourselves with more Indian food than we ever should have co
nsumed, I tried to slowly walk it off as we hobbled home. Seeing this place at night is like seeing behind the scenes of a magic show. Steam and smoke waft out of the market as they toast spices and prepare for the next day. The music plays louder, people in temple sing and twang their instruments, the incense hang in the cooling air and shops change shape.

I will miss this place like a friend.

Paratha

31/2 cups All purpose flour

11/2 tsp. salt

1 tsp. Granulated sugar

3/4 cup Ghee, room temperature

(divided)

1 lg. Egg, beaten

3/4 cup Whole milk

1/2 cup Water


  1. In a bowl or heavy-duty stand mixer with a paddle attachment, ombine flour, salt, sugar
  2. Add 1/4 cup of the ghee and rub together with fingertips (or run on low with dough hook)until mixture looks mealy.
  3. Add egg, milk, and water. Using one hand, mix until a cohesive dough forms. (Continue to mix
  4. with paddle until a smooth elastic dough is formed.
  5. Knead into a smooth, soft, elastic dough, about 8 to 10 minutes if or longer if your kneading is not so strong
  6. It should be a bit moist and soft, but not wet. Cut into eight equal pieces, about 4 oz. each
  7. Coat a 12” round of the table with about 2 Tbsp of ghee. Coat hands liberally with ghee.
  8. Stretch the dough into a sheet by flattening and pulling dough
  9. Be sure that dough is coated in ghee on all surfaces
  10. Taking one edge of the round pull dough up into a rope letting the sides ripple into each other as the hang
  11. Swirl the rope into a rosette and let rest 10 minutes
  12. Roll out rosette into ¼ inch round
  13. Using a hot pan, preferably non-stick, add a bit of ghee to the pan and brown dough on both sides
  14. Once cooked and golden brown remove from pan and squish flatbread towards itself to exaggerate the air bubbles
  15. EAT IMMEDIATELY


*** Oil may be substituted for the ghee used in the cooking process and partially within the dough- ghee gives flavor so try to use as much clarified butter/ghee as possible


Thai Green Curry (with chicken)

Green Curry Chicken

This is a must in the family of Thai food. I love teaching how to make this in my classes and I hope that you will make this at home!


Curry Paste Ingredients

4-6 Long Green Chilies

2-3 Thai chilies

2 tbsp. Chopped shallots

2 tsp. Chopped galangal

1 tsp. Kaffir lime rind (other varieties will suffice)

2 cloves. Chopped garlic

4 stems Thai sweet basil

2 tbsp. Chopped ginger

2 tbsp. Chopped lemongrass

2 each cilantro roots

1/2 tsp. cumin seeds toasted and ground

1/2 tsp. coriander seeds toasted and ground

1/2 tsp salt


Curry Ingredients

5-6 small Thai eggplants quartered (other small/mild eggplants will work as well)

3/4 cup sliced onion

3 each chicken legs and thighs

2 tsp palm sugar --to taste

2 tbsp. fish sauce --to taste

6 kaffir lime leaves

4 Stems of Thai sweet basil

2 Cups of coconut milk

1.5-2 Cups of water


Method of Preparation

  1. Place paste ingredients into a powerful blender to create a paste- adding a neutral vegetable oil as needed
  2. Fry paste in hot neutral oil until stinging aromas subside
  3. Add water and bring to simmer, let steep for about 15 minutes
  4. Remove from heat and strain mixture to remove woody plant fibers
  5. In a med-large pot sear chicken pieces in vegetable oil or better yet, coconut oil.
  6. Remove chicken from pan drain excess oil and add onions to sauté
  7. Once onions are a hair translucent add chicken, 3 lime leaves and strained curry mixture and let gently simmer covered until chicken is tender
  8. Add in eggplant- let cook a bit
  9. Add in coconut milk, fish sauce, and palm sugar
  10. Garnish with ribbons of lime leaf and Thai basil leaves
  11. Serve with jasmine rice
**Ingredients like lime leaves and lemon grass can be found in asian grocers, I buy mine near minneapolis. Other asian ingredients used in this recipe can be found in the asian food isle of larger grocers such as large a Hy-vee or Whole foods. Happy cooking!

This was the first wet curry dish we made in Singapore, and although it has fish in it, the coconut milk made up for it in my phase of fish hatred- see earlier posts. THis can easily be made vegetarian by leaving out the fish and increasing the vegetables or using a firm tofu. I loved this dish and I hope you do as well


Ingredients
2 tbsp Cooking oil
1/2 tsp Fenugreek Seeds
3 sprigs worth curry leaves
2 cloves of garlic minced
1, 1/2inch piece of ginger (made into paste by mincing or in food processor)
1 medium red onion-halved and sliced
1 green chili- split in two
4 tsp fish curry powder ** See recipe below**
1.5 tbsp Tamarind (make a pulp by soaking tamarind in 1 cup of cold water- strain before use)
1 cup small okra (I find that substituting green beans or zucchini works well)
1 tomato chopped
12 oz sea bream (or other white fish cut into 3-4 pieces)
2-3 tbsp coconut milk
salt to taste
cilantro for garnish

Method of Preparation

  1. Place oil in sauce pan over medium heat
  2. Add fenugreek and saute without burning- about 20-30 seconds- color of seeds shouldn't change
  3. Add curry leaves- these will crackly and pop in oil- this is good
  4. Add ginger, garlic, onion and saute until translucent
  5. Add curry powder and chilies, stir until fragrant- do not burn
  6. Add tamarind water, tomato, and okra, simmer for about 5 minutes
  7. Add fish pieces and coconut milk- turn to low and cover, cook for about 5 minutes, until fish is done
  8. Season with salt and garnish with copped fresh cilantro leaves, serve over rice
Fish Curry Powder

1 tsp turmeric powder
1 tsp cumin powder
2 tsp red chili powder
1 tsp coriander

TIPS on where to buy products

  • Food such as fresh ginger and all the spices listed above are easily found in larger Hy-vee stores
  • Curry leaves are more rare, most abundant in the summer and fall I purchase mine at a small Indian market in Rochester. They are inexpensive and can be frozen to use throughout the year.
  • Fenugreek- although it is a more rare spice in our area is easily found in larger grocers and online- look for the whole seed not the powder


Biryani Recipe


This is perhaps my favorite rice dish! More than mushroom pilafs, fried rices, and even more than risotto. It is basically an Indian pilaf made with meat on the inside. But to me it is a hearty bowl full of fat-glossed and stock-stained grains, moist pieces of meat, and a steam of spices that permeates my skin as I sneak a peek from under the lid. This ingredient list may seem long but that's only from the many spices. Please, don't be intimidated! Try this recipe at home and let yourself feel the warm enveloping comfort of the sweet and spicy aromas and tastes that are Chicken Biryani

INGREDIENTS
2 cups Basmati Rice (washed)
1 medium Onion (halved ans cut into 1/4" slices"
3 cloves Garlic (made into paste by mincing and mashing with knife)
1/2 inch Fresh Ginger (made into a paste same as garlic)
2 Chicken hind quarters (thigh and leg with skin on)
3.5 cups Chicken Stock
1 pod Black Cardamom
2 each Star Anise
2 small or one large piece Whole Mace
1/2 tsp Pepper Corns
3/4 tsp Cloves
2 each Cinnamon Sticks
1.5 tsp Chili Powder
1/5 tsp Paprika
1/2 tsp Coriander ground
1/4 cup Ghee (aka clarified buter) or butter and/or Oil
8 Curry Leaves
1/4 cup Raisins
1/4 cup Dried Cherries
1/2 cup Cashews
to taste Salt
1/4 cup Fresh Cilantro chopped

Method of Preparation
  1. Separate chicken thighs from legs to aid in searing and even cooking
  2. Sear chicken in hot oil making outsides golden brown
  3. Remove chicken from oil and set aside, drain excess oil and toast cinnamon, clove, star anise, pepper corns, and mace for about a minute over medium heat
  4. Add in ground spices, garlic, ginger, and onion- saute for a minute or two without burning the pastes
  5. Add in rice and chicken stir well
  6. cover with stock and bring to a boil
  7. Give it a good stir then turn heat down and cover
  8. Cook until the rice soaked up the stock
  9. Add in dried fruit, cashews, and cilantro.
  10. ENJOY!!

Cooking in Italy


I am so full! I’ve just finished several platefuls of pici cooked two ways, panzanella, stewed beef, roast pork with potatoes, and more. I think I will never be ale to keep up with the Italian eating habits. The meals seems to last forever and if we didn’t insist we had somewhere to go, I am nearly certain that the meal would continue for hours and end only to begin the next meal.

This meal like, many of our meals in Tuscany was from a local restaurant, the special thing about today’s food was that . . .we made it.

As we walked into this tiny restaurant, a smiling face haloed with rusty-colored airy curls greeted us. As the woman in white hovered toward a table covered in fresh tomatoes and herbs the group eagerly tied our aprons round our waists. First on the list to create was Panzanella.

Panzanella is a salad of fresh tomato, herbs, olive oil and old bread that has been rehydrated with water. Here’s why this is a unique food to Tuscany. Tuscan bread is made without salt as remembrance to a boycott of salt when the taxes for it rose to an amount the locals refused to pay. This creates technique makes Tuscan breads taste a bit bland and have a texture that is a it irregular and crumbles easily. However there are some benefits to leaving out the salt. With no ingredient that collects and holds moisture Tuscan bread doesn’t mold. Instead it dries into what may feel and look like the perfect murder weapon to a perturbed cook. Traditionally, as fractions of loaves became too dry to serve they would be tied up in cloth and hung from the ceiling in a kitchen. To use these sachets of unwanted bread some cleaved Italian thought of adding water back into bread along with some fantastic fresh and flavorful ingredients.
To make this true delicious salad, all you will need is the following:

PANZANELLA

1/2 of a large loaf of old crusty bread that is now completely dry
A tub of water- enough to submerge the loaf
2 tbsp red wine vinegar
1 tsp salt
1 cucumber chopped
2 cups tomato chopped
1/2 red onion chopped
2 tbsp fresh parsley chopped
2 tbsp fresh basil chopped
Olive oil to taste- a few tablespoons
Salt
Pepper

Directions
  1. Dissolve salt in vinegar and add to tub of water.
  2. Add the bread and allow it to soak until the bread has softened.
  3. Picking up the loaf in pieces, squeeze out as much water as possible and crumble the bread into a large mixing bowl (the bread should be damp and crumble at this point and not mushy or soggy).
  4. Toss the bread with the remaining ingredients, being very generous with a good quality olive oil, salt, and pepper.
After the salad was finished, we moved into pasta making. In this region, pasta is made very differently than in other areas. The dough, rather than being made only eggs and flour, it is made of mainly water and flour with some egg. This makes a dough that is not rolled out flat and cut into pasta but is rolled between one’s fingers into a long spaghetti-like strand called pici. Look below for the recipe.

PICI

2 cups all purpose flour
2 cups semolina flour
1 egg
Water
2 tbsp olive oil

  1. Mix the two flours on your board (or in a bowl if you are more comfortable) and create a well in the center.
  2. In the well make a pool of the egg, oil, and water
  3. Using your first and second fingers, begin making small circles that gradually incorporate the flour into the wet mixture. I find it can be difficult to keep the wet mixture within the flour. The chef taught me this can be remedied by making the well wider as your go rather than keeping it tall and full. Spreading out the goo and flour into a wide shallow well is very effective.
  4. Once the mixture is incorporated it should be moist but not sticky. If it is too dry or too wet just add water or flour accordingly.
  5. Using your body weight take both hands and kneed the dough and strong motions. Do this until the dough is smooth and strong- about 20 minutes
  6. Now let the dough rest about 30 minutes- this allows the gluten, protein found in wheat, to relax. This makes a for a pasta that will be tender and soft rather than tough and chewy. Be sure you let your pasta rest!
  7. Next cut off small portions and roll back and forth between your fingers and palms. You can also roll the log by pressing and rolling on the cutting board.

NOTE -This style of rolling the pasta is very labor intensive and takes quite a while. IFYou can use a pasta cutter or rolling pin and a knife to cut this pasta so as to save time and effort if you wish.

The way Chef Gina dressed our pasta was simple and classic to the region, Sugo di Pomodoro e Basilico Fresco (fresh tomatoes and basil). To dress your pici in the same way you will need:
2 cups fresh roma or plum tomatoes -any ripe and fleshy tomato will do
2 cloves garlic
Olive oil- to taste
2 Tbsp fresh basil, chopped or torn roughly
Salt
Parmigiano cheese

Gently saute the garlic in the olive oil until soft. Add the tomatoes and cook for five minutes more adding salt to taste. Add the chopped basil and toss with pasta and top with shards of parmigiano.

Surprisingly I had no trouble eating all this food. It just was so delicious and all the wonderful wine seemed to assist me in eating more of it. I hope these recipe help you all have just a taste of Italy back home. With the abundance of fresh produce available now, you will have no problem achieving the taste of Tuscany. Just remember to keep it ripe and simple using plenty of good olive oil and time. Good luck and happy cooking!

If you have any questions please feel free to leave comments and I’ll do my best to answer them of send your question on the Chef Gina who will definitely be able to answer you.